
Please feel free to check out this blog post on my personal website, eddycolloton.com
1973-1974 – Water Skiing and Snow Skiing from Eddy Colloton on Vimeo.
My grandfather, James Colloton, Sr. (1926-2014), or “Papa” to my cousins and me, recorded home movies of my dad and his siblings with his 8mm film camera. Christmas mornings, family vacations, sledding in the front yard, and water skiing every summer, all moments mechanically frozen in time and stowed away in a film canister. These memories are obviously important to me and my family. When my father and I watched these films together, I could tell that, for him, these images re-ignited forgotten memories and meaningful moments. For me, seeing my dad play with his siblings during summers at Green Lake, Wisconsin (where members of my family still go every summer), or seeing him joke around for the camera on Christmas morning, just seeing how he dressed when he was a teenager, lets me know him in a way I didn’t before. These films offer me insight into my family from a new perspective, allowing me to experience their daily lives and have a new appreciation for family traditions–hopefully what my grandfather had in mind when he made the films in the first place.
1969-1972 – Christmas and Green Lake from Eddy Colloton on Vimeo.
But the value of my grandfather’s home movies extends far beyond the branches of my family tree. As some of you likely already know, the study of home movies and amateur cinema has taken off in the last twenty years. These depictions of domesticity contain unique evidence of everyday life told in the language of the moment. Home movies can be first hand “accounts” of cultural traditions, documentation of race relations, even raw material for scientific study of social disorders. As Yvonne Ng writes, “By reading at the margins of the film, overlooked elements of the past can be brought to light” (The Moving Image, Vol 10, No 2, Fall 2010).
1964 – Cuddly Duddly from Eddy Colloton on Vimeo.
To this end I have started what I hope will become a collaborative bibliography focused on writings, research, and repositories of/about/around home movies. The current contents of the bibliography (as of this writing, October, 2016) are incredibly indebted to the syllabi of Snowden Becker, the Small-Gauge and Amateur Film Bibliography edited by Margaret A. Compton (compiled by
Margaret A. Compton, Katie Trainor, Karan Sheldon,
Dwight Swanson, and William O’Farrell), and Jasmyn Castro’s 2015 MA Thesis Unearthing African American History & Culture Through Home Movies. Please take a look and contribute your own articles, websites or repositories dedicated to home movies: https://www.zotero.org/groups/home_movies

The evolution of motion picture technology has not smiled on celluloid. As a result, my Dad and his siblings haven’t seen this material for years. The films have spent time in basements and in boxes, out of sight, and out of mind. As my aunts and uncles have started families of their own, and as cameras turned from luxury items to pocket sized necessities, these recordings, locked in an obsolete format, took their place with old yearbooks, sports trophies, and other relics not quite gone but basically forgotten.
Films chemically degrade over time, and unless they are stored in a climate controlled environment, they can deteriorate past the point of salvage. But obsolescence and obscurity are far greater threats to film than decomposition. For most of us, film is only a few steps away from being an ancient scroll written in Greek. In an era of “smart TVs” and refrigerators with an ethernet jack, extracting meaning from the twenty or so reels of 8mm film my grandfather filed away for posterity is next to impossible. In order to pass on these memories, our Rosetta Stone is digitization.
Like any translation, converting a film to a digital file isn’t a process of exact duplication. For one thing, there’s several ways to go about it. Home video copies of theatrical films used to be made through a process called telecine. The current en vogue methodology is to scan films, essentially taking a picture of every frame. Regardless of how it is done, all of these techniques involve a great deal of agency by those making the conversion. Creating a digital version of a non-digital artifact, no matter how faithful, is an inherently transformational process. In fact, the act of creating a digital copy of a book was found to be transformative by the Second Circuit court. Given this level of manipulation, there are a lot of choices to be made when one goes about migrating content from film to digital. What resolution? What file type? What scanning method?
This whole process was a bit of an experiment for me, so I had the luxury of making some low pressure decisions. Moreover, I didn’t need my files to be uniform or consistent, so I could choose different options for different film reels. Finally, I had the benefit of my professional network, where I could turn for advice or help along the way.
FilmScanner3 from Eddy Colloton on Vimeo.
My good friend and fellow MIAP alum Ethan Gates works at NYU, and writes a super cool blog, which you should all read, called The Patchbay. Ethan showed me how to scan three of Papa’s home movies using the MIAP Lab’s MWA FlashScan Choice 2K Plus, made by MWA Nova GmbH in Germany. Ethan told me that the “Choice” in the model name indicates “you have the option to get different gate pieces, sound heads and rollers to handle different gauges and soundtrack types according to your liking – I’m pretty sure we went with what was the full package at the time, including 16mm, 8, Super8, 9.5 and 17.5mm gates/rollers and 16mm optical, 16mm mag-stripe, 16mm full-coat mag and 8mm mag-stripe sound heads.” Having the right tool for the job is always important, and this scanner worked well for this project, but the best equipment in the world could be used to create an awful looking result. As I’ve said, there’s still a great deal of agency involved in this process.
In photochemical film duplication (which can be done in a variety of ways), the amount of light exposed to a film is determined by a process of “color timing.” Varying shots are exposed to different amounts of light to create a more uniform appearance throughout the film. Artist Margaret Honda recently drew inspiration from the process of color timing to create two films, Spectrum Reverse Spectrum (2014) and Color Correction (2015).

Film scanning is similar to traditional color timing, in that the amount of light that passes through the film, and the sensitivity of the sensor imaging the film, impacts how the resulting copy will look. The MWA software lets the user preview the image through a waveform monitor and vectorscope, and then adjust the scanner’s sensors accordingly. The MIAP Lab has an Avid Artist Color Control Surface to help you pretend you’re some sort of futuristic film preservation video DJ person (also to have more precise control over color adjustments, I guess). Inevitably, some of the scenes on each reel would be very bright, while others would be very dark, some would be very red, while others were very blue. All of this could be accounted for by adjusting the “Black,” “Gamma,” and “Light” color wheels using the Artist Color Control and the AgiScan software, but no one setting would fix every scene.
While the film scanning software that Ethan and I were using, MWA AgiScan, does allow for more precise control, to save time and effort, we decided to set the exposure at one level for the entire scan. This is reminiscent of the photochemical process of a “one-light” print. I tried my best to find a setting that would strike a balance between the more disparate looking scenes.
Forgive this tangent, but, I found this process to be quite similar to setting processing amplifier adjustments during video preservation projects. When migrating analog video to digital formats, the goal is to send the best possible analog signal to the analog to digital converter. This is can be achieved by monitoring the signal via a waveform monitor and a vectorscope, while stabilizing and modulating the signal through a time base corrector (TBC) and processing amplifier (ProcAmp). I describe this process really briefly in the following video (starting at 2:40). Shout out to APEX Santiago!
APEX Santiago 2016 – Señal 3 Community Archiving Workshop from Michael Pazmino on Vimeo.
While it’s certainly not perfect, I think the “color timing” I performed on these films turned out pretty okay. Sure, Ethan and I could have spent a few more hours on each reel and really done a number on these scans, but neither of us were so inclined. Besides, having less than perfect scans has been a great opportunity for me to try to teach myself color correction using DaVinci Resolve. I’m taking the lynda.com tutorial on DaVinci Resolve, and I’m currently about halfway through the process.
Color Correction Demo from Eddy Colloton on Vimeo.
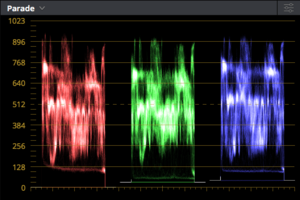
Essentially, I have done my best to make stuff that looks really weird look, well, less weird. Since I was mostly looking to prevent a scene from being too green, or too red, I would look for spikes of those colors on the software’s digital waveform monitor. I would then adjust the color values, primarily by moving the RGB channels through the Lift, Gamma, and Gain control. It sort of becomes a game, trying to get individual color values to line up on the waveform monitor, or trying to make the RGB parade waveforms symmetrical shapes. I was often making changes without even looking at the picture. I found that I could rely on the waveform monitor far more than I could on my own opinion of what color a particular shot needed. There’s still more work to be done! If there’s interest, I’ll do a second post about my experiences with color correction.


So I’m not mad at how the scans look. If I could go back and change one thing about the process, it wouldn’t be how I scanned the film, but how much of the film I scanned. One can position the lens on the scanner to capture the full length of the film, from edge-to-edge. As you can see from the videos, I only scanned one film edge-to-edge. In retrospect, I wish I had done them all like this, because I have found a lot of useful information outside of the picture area of the film.
The first thing I noticed were these scrolling “burned in” silhouettes of perforations along the left side of the frame. I had no idea what they were, so I asked for help.

My biggest take away from my last two and a half years of schooling, internships, and fellowships, is that there’s no greater asset than the time and generosity of an expert. An additional lesson, one I keep re-learning, and sometimes still struggle with, is that experts are happy to share their knowledge, all you have to do is ask! (Btw asking cost you nothing, except maybe having to admit that you don’t know everything, which is not a surprise to anyone).
Within a few hours of reaching out to experimental filmmaker and film preservation guru Bill Brand, I had the answers I sought. Bill writes:
“Regular 8mm film before it’s developed is 16mm film with extra sprocket holes. When you load it into the camera the first foot or so of the film is exposed to light and appears in the image as white or as a flare in. Since the sprocket holes are clear, the light passes through them and exposes the film on the layer below them on the spool. Sometimes the sprocket holes line up but usually not, so you see an impression of the sprocket hole where the light leaked through.
When the film runs through the camera only one side of the film is exposed to the 8mm gate. When the film runs out, you remove the film from the camera, flip the spool over, move the empty spool from the top to the bottom, place the spool with film on the top, and thread the film through the camera again. This allows you to expose the other side of the film, albeit upside-down and backwards to the first side. After the film is developed in the lab, they split the film down the middle and splice the tail of the first side to the tail of the second side, thus flipping the second side so that it now plays right-side-up and forward.
You’ll notice, if you have unedited reels of film in your collection, that every reel has a splice in the middle. You’ll also notice that there are flares, not only at the beginning and the end of the reel, but in the middle too. These probably include the sprocket flares that you’ve noticed.”

Bill was my teacher at NYU, and taught me about light leak, the effect caused by light striking unexposed film inadvertently, usually along the side, but I had never seen it manifest like this (through the perforations). Regardless I think it’s one of my favorite uniquely filmic aesthetic qualities, and one you see in amateur cinema quite often.

Similarly I have always liked, but never really understood, these “dots” that tend to be toward the end of amateur films. I found an article from the Underground Film Journal in which Laura Major of Colorlab explains:
“[The dots are] punched out in the shape of numbers and letters that match the batch & emulsion number on the box or can of film.”
I had an exchange on twitter about the dots with Snowden Becker and Ashley Blewer that yielded two different nicknames: “bubbles” (because they look like champagne bubbles) and “Warholititus” (since they’re in a bunch of Warhol films). Does anyone know there any other nicknames (or technical terminology)?
While I was a student in the MIAP program, I participated in a group project where we tried to identify information about a film from the Moving Image Research Collections at University of South Carolina. One of the go-to tricks is to look for “edge code” (sometimes called key code) on the film, which can provide all kinds of clues. Kodak 16mm, for instance, uses a series of shapes that indicates which year the film was made (chart here).
This film has a few codes on it. Black text on a white background reads “SAFTEY FILM KODACHROME.” “Kodachrome” is a color film stock invented in 1936, and is known for its ability to resist fading. The “safety film” part just means it’s made of cellulose acetate instead of cellulose nitrate, and therefore won’t catch on fire and burn down your house.

There’s another code, that often overlaps the Kodachrome code. White text that reads “Processed by Kodak AIIG 60” or maybe “Kodak AHG 60.” ¯\_(ツ)_/¯
Does anyone know what this means?
Later on, there’s a second code on the film. It’s hard to make out, but I think it says “I.I 73 (circle) (circle)” in white text, and then “Kodachrome A” in black text on a white background. The processed code has changed too, it now reads “Processed by Kodak DEC [#]0.” Unfortunately, I didn’t take time to wind through the film on an inspection bench and make note of any splices on the film, so I’m not absolutely positive, but my suspicion is that this section was spliced in, which would explain the different codes.


These films have been an opportunity for me to invest in my personal interest, but also a chance to invest in my past, and my family. It’s easy to settle in to assumptions, or to presume to know the whole story. I’ve been lucky enough to know my dad my whole life, but these films help me see I won’t ever stop getting to know him. I’ve always wondered how he and I would interact if we had just met each other on the playground, at a college party, at a new job. Of course, I will never know, but these films, and talking about them with him, serves as a reminder not to lean on any presumptions. Home movies can be a catalyst towards a shifting, and evolving understanding of the world. We can never get too comfortable with our ideas about the past, or our ideas about each other.
I just want to end with a big thank you to everyone who helped me with this project, and everyone who has expressed interest in these films. It means a lot to me, and it has meant a lot to my family to see these films again. If you have some old film cans lying around in your basement, I would urge you to dig them out and take a look. You never know what you might find. Happy Home Movie Day!
This post was written by Eddy Colloton, resident at Louisiana Public Broadcasting.


Very cool to see how all these pieces have come together, Eddy, from the various tweets and email exchanges we’ve had over the past few months! I would like to add one more media-archaeological tidbit to your dossier on your family’s films (and one more reason to scan material like this edge-to-edge if the option is available): It’s actually possible to tell from this which model of camera they were shot with. In this case, that’s a Cine Kodak Eight, Model 55 (Kodak code: H8-1), which was manufactured in England. How do I know? Well, if you look at the edge of the exposed area opposite the perforations–especially in brightly lit frames–you’ll see a semicircular “bump” near the top of the vertical frame boundary. That’s the unique identification mark made by the aperture plate of this particular model of camera.
Alan Kattelle’s wonderful book “Home Movies: A history of the American industry, 1897-1979” includes an appendix that lists all of the known camera identification marks, reproduced from a booklet issued by Eastman Kodak. It’s an incredibly helpful resource if you’re working with collections that include mystery films–along with edge codes, camera markings can help establish a no-earlier-than date for a film’s creation, and different reels with the same camera marking are more likely to have come from the same family collection. For families that still have the equipment associated with their film collections, it can be really cool to be able to say “THIS particular reel was probably shot on THIS very camera.” If you’re doing a screening and happen to have a camera of that model you can pass around to the audience, that can be a meaningful teaching tool, too–even the most compact 8mm cameras are considerably heavier and bulkier than the smartphones we’re using to create our home movies today.
The origin and motivation for the practice of altering aperture plates on different models of camera to produce these markings is still a bit of a mystery. As Kattelle notes, “While it would appear that this practice was industry-wide, it is not known when it was instituted, nor by what agreement among the various manufacturers.” Nevertheless, it’s another pretty nifty little secret that’s usually hiding just outside the visible area of family films, and a piece of information that we’re better able to capture, observe, and preserve in our current digital environment!
LikeLike